
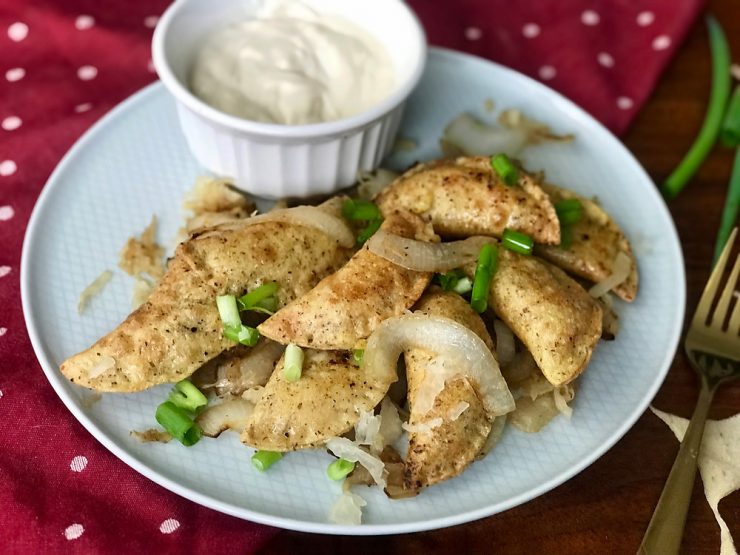
I was introduced to pierogies by my best friend and college roommate. Her Ukrainian grandmother used to make them from scratch every Christmas, and I was lucky enough to benefit from all of her hard work! They are still one of my favorite foods, but I have never been able to find a vegan and gluten free alternative at a grocery store or restaurant, so I decided I would have to learn to make them on my own! I went with a chickpea flour pasta to give this a nice protein boost! It can also be made entirely oil free, and the only oil I used for mine were for a little spritz of oil in my air fryer! I caramelized my onions in veggie broth, and you can too! These are labor intensive, but the good news is that they freeze really well. You could make a single or double recipe and freeze the pierogies after you assemble them and before you boil them! This is how we made them:
Gluten-Free Vegan Pierogies
Chickpea Pasta:
1 flax egg (1 tbsp very fine flax meal + 3 tbsp warm water)
1 ½ cups chickpea flour
¼ cup tapioca starch
¼ cup glutinous rice flour
1 tsp xanthan gum
½ tsp salt
½ cup warm water
Potato Filling:
1 ½ lbs yukon gold potatoes, peeled and cubed
½ cup raw cashews
½ cup boiling water
1 garlic cloves. Minced
2 tbsp nutritional yeast
1 tbsp lemon juice
2 tsp brown miso
½ tsp paprika
½ tsp salt
Pepper to taste
Serve with:
Sauteed onions
Sauerkraut
Vegan sour cream
Directions:
In a tiny bowl, assemble your flax egg. I would suggest running your flax meal through a coffee grinder if it isn’t already super fine. Mix it together, and set it aside for about 5 minutes.
Add the cashews and boiling water to a high powered blender and let it sit to soften the cashews while you prepare your pasta.
In a medium bowl, mix together the chickpea flour, tapioca starch, rice flour, xanthan gum, and salt.
Make a well in the middle of the flour mix, and add in your flax egg once it has set up. Add about ¼ cup of the warm water, stir until the mixture is crumbly. Then get in their with your hands. Add water slowly until the dough sticks together. It should be tough but cohesive. If it gets too sticky, add in more chickpea flour. Continue kneading for a few minutes. This is your workout. Did you skip the gym today? I’m here to push you and tell you that you can knead this dough for 10 more reps!
Wrap your pasta in a reusable wax wrap or plastic, and let it rest for 30 minutes. There’s no rest for you, however! These potatoes are not going to make themselves!
Place the cubed potato pieces in a medium pan and cover with water. Lightly salt the water and bring to a boil on the stove. Reduce to a simmer, and cook for 20 minutes or until the potatoes are soft and crumbly.
Now back to the cheesy cashew cream. Add the garlic, nutritional yeast, lemon juice, miso, paprika, and salt and blend until smooth as vegan silk. Set aside.
Drain the potatoes and put them either in a Kitchenaid bowl or a mixing bowl. Let’s mash these potatoes. To do this you can either use a mixer or a potato masher. Do not use a blender as this creates gummy potatoes. After the potatoes are 90% smooth, add the cheesy cashew cream and blend until thoroughly mixed. Adjust the salt, add some pepper. You want the potatoes to be a little over seasoned since they’ll be inside of the pasta. Set aside, and let’s get back to that pasta.
Heat a large pan of salted water on the stove for boiling the pierogies, and then let’s make this pasta!
I find that they key to good pierogies is making sure you roll your pasta thin. Personally, I like the ease of a pasta press, but every once in a while when I can’t find the clamp to secure my press to my counter (literally 98% of the time I want to use my press), I roll it out instead, and it can be done! Whether you’re using a press or a rolling pin, you’ll want a flat surface and to lay out some gf flour or some chickpea flour. Knead the dough in the flour and make sure there is enough flour under the dough so it won’t stick and enough flour on the dough so your pin won’t stick. Roll out your dough very thin either with the pin or with the press.
Using a biscuit cutter, cookie cutter, ravioli cutter, or even a glass, cut the dough into 3”-4” circles and place in a single layer on parchment paper. Don’t let them stick together or you will hate your life if you have to start over!
To assemble the pierogies, you’ll want a small bowl of water to wet the edges of the circle. Once the edges are wet, place a small amount of the potato mix in the middle of the pasta. You’ll want to use about a tsp or so of the potato mix. I have never once guesstimate the correct amount and over or under fill every single time. Fold the pasta in half, seal the edges, and then I use a fork to press around the edges to make sure they’re sealed and slightly fancier.
To cook the pierogies, give your boiling water a stir, and drop them in one at a time making sure they don’t stick. Also, do not crowd your water! Pierogies are introverts and need their time and space. They do not like sit too closely to the other pierogies while they cook. Work in batches! Cook the pierogies for 8-10 minutes so pasta is cooked all the way through.
Remove the pierogies with a slotted spoon.
You can eat the pierogies soft like this, but I prefer them air fried or pan fried.
To air fry, spray the air fryer with a little oil, and then spray the pierogies with a little oil. Season with salt and pepper and cook at 350 F for 10 minutes, flipping halfway through.
Serve with sauteed onions, sauerkraut, and vegan sour cream.
Final Taste Test: Gluten-Free Vegan Pierogies
These gluten-free vegan pierogies prove comfort food can be kinder to your body and still steal the show. Soft, pillowy dumplings stuffed with savory mashed potatoes (or your favorite vegan filling) make this vegan pierogi recipe perfect for weeknights and dinner guests alike. Want them boiled for nostalgia or pan-fried for crunch? Both win.
- Why it works: a sturdy, gluten-free dough that seals and holds.
- Quick tip: chill the dough 20 minutes for tidy edges.
- Serve with: caramelized onions, vegan butter, or cashew sour cream.
Give one batch a try—then switch up the filling next time. Which version will become your go-to: cozy and soft or golden and crispy?


Add comment